| |
| World(s) | Ruins |
| Type | Ruins |
| Music Theme(s) | Button Bash, Voices of the Temple Returns (or Temple Topple) |
| Animal Buddies | None |
| Bonus Room(s) | 2 |
| Puzzle Pieces | 7 |
| Notable Feature(s) | The level features many buttons to open new paths activated by ground-pounding and blasting from barrel cannons at the right moment. This level is also the only one to feature Humzees. |
| Enemies Encountered | Tiki Tanks, Stilts, Humzees, Tiki Goons, Tiki Zings, Tiki Torches |
| Game(s) | Donkey Kong Country Returns, Donkey Kong Country Returns 3D |
| First Appearance | Donkey Kong Country Returns (2010) |
| Latest Appearance | Donkey Kong Country Returns 3D (2013)
|
Button Bash is the nineteenth level in the games Donkey Kong Country Returns and Donkey Kong Country Returns 3D, as well as the second level in the Ruins world of Donkey Kong Island. It is preceded by Wonky Waterway and followed by Mast Blast.
Overview[]
The level features many buttons to open paths and rearrange obstacles. These buttons need to be activated by ground-pounding or using timely blasts from barrel cannons. This level also debuts the enemies Humzee and Tiki Tank, which the player needs to ground-pound close by to make it vulnerable to normal attacks.
Walkthrough[]
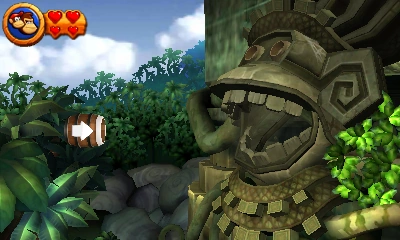
Start by ground-pounding the under the statue's mouth to the left. Quickly run out of it and then back to the left to collect the first Puzzle Piece on top. Continue going right into the autofire barrel and then into the monkey statue's mouth. Go to the left and ground-pound nearby the yellow plant to get the second Puzzle Piece. Go right and pound on the red button three times to reveal the DK logo and create a path of barrel cannons. Jump in the first barrel and blast to the second. In the second one, blast to the left and cling on ceiling. Climb the grassy turf of the ceiling and go to the left to get the third Puzzle Piece. Fall down, go back into the barrels and go right to finally reach a stone floor.
Bounce on the Tiki Tank to collect the letter "K" and then jump into the barrel cannon to the right. Shoot when the barrel is aiming at the red button then to the right. The wall to the left will start moving right. Run to the right and the wall will stop. Carefully, defeat the all six Humzees to reveal two barrel cannons. Jump into a barrel and shoot across to the other barrel when the red targets are lined up with the barrels path. Do this another two times in order to reveal a new barrel to blast you below the level. Go past the Tiki Goons and go into the next barrel cannon. You will reach a series of barrel cannons. Shoot avoiding the Tiki Zing and shoot on the red button to open the path forward. At the last barrel cannon, shoot into the wall (the lowest point the barrel can go) and you will be sent into a Bonus Room. There, use the two barrel cannons to collect all eighty bananas and two Banana Coins within thirty seconds and get the fourth Puzzle Piece.
After the Bonus Room, you will land on a wooden bridge. Carefully, use the Stilts to bounce high and reach the letter "O". Go right and keep pounding on the DK Platform to open the path. Go into the revealed autofire barrel to be shot to the checkpoint. Jump onto the grassy turf of the ceiling and climb to the left. Pound nearby the yellow plant to reveal a barrel cannon. Use it to shoot into the wall to a second Bonus Room. In there room, use the moving barrel cannon to collect all fifty-seven bananas, two Banana Coins and an Extra Life Balloon within thirty seconds and reveal the fifth Puzzle Piece. After the Bonus Room, climb the grassy turf to the right and fall into the autofire barrel. Shoot into the next barrel and you will be in below four red buttons. Shoot the barrel when you are placed directly beneath each button with good timing and avoiding the revealed spikes. This way, the grass turf on the ceiling will soon be exposed. Shoot the barrel towards the ceiling and cling to it. Move right and let go when the spikes are in your way. Blow on the Tiki Torch to expose it and go past it.
Jump across the spikes and move on until you reach another Tiki Torch. Defeat this one in the same way or go past it and cling on the grassy turf of the ground to the right. Follow it downward to reach the sixth Puzzle Piece. Climb back up and use the grassy turf of the ceiling and go to the left and upward. Use the barrel cannon and red button to remove the spikes on the left side of the wall. Continue going upward. Go right down the wooden bridge and jump into the barrel cannon. Use the barrels to move to the top of the barrel maze. Use the top barrel to shoot down to the right. Hit the red button and then shoot to the next barrel to the right. Shoot at the letter "N". Shoot back to the top barrel and shoot back to the left. This left barrel will shoot directly across. Shoot the next barrel to the right. Finally shoot into the checkpoint.
Go right and defeat all four Stilts to reveal a red button on the ground. Pound on the button three times to start the sequential platforms. The point here is to use these platforms to reach the top right. You will need to make some detours and using Diddy Kong's rocket pack can help. Start by using the platforms to go to the center of the room to collect the letter "G". Now make your way to the left side of the room. Once you get to the platform up there you will reveal the seventh and final Puzzle Piece. Now make it to the top right of the room and into the autofire barrel. This barrel will shoot you into the background and around a large statue. Shoot into the monkey statue's mouth. You now have only four tries to shoot right into the spinning statue's mouths. Using more good timing each time, shoot into the mouths two times and the statue will reveal the Slot Machine Barrel to finish the level.
Enemies[]
- Stilts: 6 (2 regular type & 4 unfeathered type)
- Tiki Tank: 3
- Humzee: 6
- Tiki Goon: 4
- Tiki Zing: 5 (regular size)
- Tiki Torch: 2
Items[]
- Hearts: 2
- DK Barrels: 2
- Banana Coins: 5 (counts 2 in the first Bonus Room and 2 in the second Bonus Room, does not count three or more consecutive jumps on enemies)
- Extra Life Balloons: 1 (counts 1 in the second Bonus Room, does not count eight or more consecutive jumps on enemies)
K-O-N-G Letters[]
- K: After the third Puzzle Piece, bounce on the first Tiki Tank to reach the letter "K".
- O: After the first set of barrel cannons and a Tiki Zing, carefully bounce high on the Stilts to reach the letter "O".
- N: After the first checkpoint, at the set of barrel cannons and Tiki Zings, use the barrel cannons to hit the red button on the far wall. This will alter the environment, allowing you to get the letter "N". Avoid the autofire barrel or it will be necessary to restart this entire level to able collect the letter after reach the second checkpoint.
- G: After the second checkpoint, follow the sequential platforms up the wall. The letter "G" is towards the top in the middle.
Puzzle Pieces[]
- 1: Immediately after beginning the level, knock over the stick holding up a part of a statue and quickly get away. Now you can climb on top of it and collect the first piece.
- 2: After being blasted across the monkey statue's mouth, the Puzzle Piece can be found by ground-pounding nearby the yellow plant to the left.
- 3: After activate the first button, the Puzzle Piece is found above the second one by using the barrel cannons, clinging on the grassy turf of the ceiling and going left.
- 4: At the first set of barrel cannons with a Tiki Zing, when inside the last one, wait for the barrel points towards a crack on the wall and shoot straight to find a Bonus Room. There, use the two barrel cannons to collect all eighty bananas and two Banana Coins within thirty seconds and make the fourth Puzzle Piece to appear.
- 5: After the first checkpoint, climb the grassy turf of the ceiling, go to the left and pound close by the yellow plant to reveal a barrel cannon to another Bonus Room. In the room, use the moving barrel cannon to collect all fifty-seven bananas, two Banana Coins and an Extra Life Balloon within thirty seconds and reveal the fifth Puzzle Piece
- 6: After the second Bonus Room, go past the second Tiki Torch and follow the grassy turf down the ground to find the Puzzle Piece.
- 7: After the second checkpoint, follow the sequential platforms up the wall. Make your way to the upper left. There is a hidden area with the final Puzzle Piece.
Puzzle[]
The puzzle of Button Bash is of a cherry against a light yellow background. When all of the pieces are found, the Stilts artwork will be added to the Critters 1 Gallery of the Image Gallery in the Extras menu.
Time Attack Medals[]
- Shiny Gold: 02:11.00
- Gold: 02:24.00
- Silver: 02:35.00 (02:45.00 in the Japanese version)
- Bronze: 02:49.00 (03:09.00 in the Japanese version)
Gallery[]
")
")
")
")
")
")
")
")
")
")
")
")
")
")
")
")
Videos[]
 (15 KB)")
 (24 KB)")